Wednesday 30 July 2014

Repeat Patterns

DESIGNING A TILE UNIT INSPIRED BY NATURE


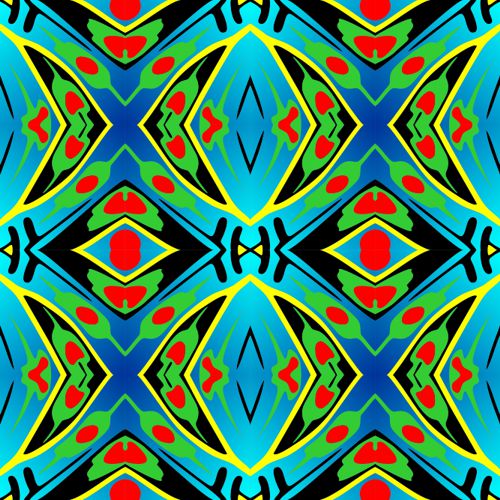
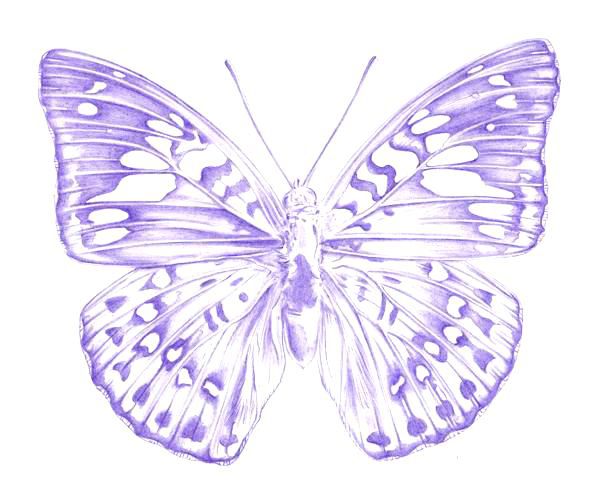
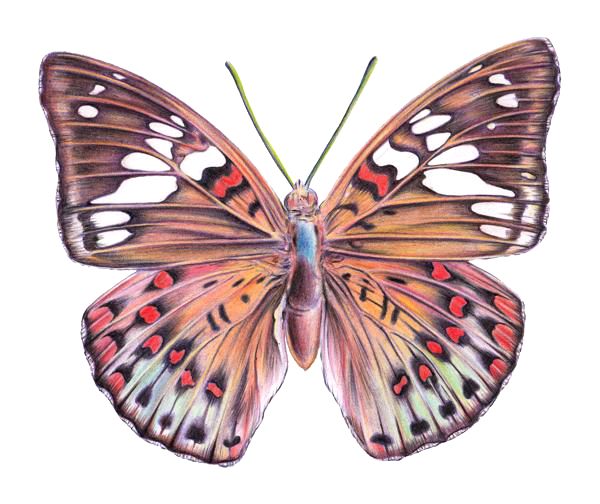
A repeat pattern based on the wing of a butterfly.
This lesson on repeat patterns teaches you how to design a tile unit for a 'mirror repeat' pattern using a drawing from nature to inspire your design.
NOTE: Throughout this lesson we use the term 'tile' to describe the unit that will be duplicated to create a repeat pattern. Although you can use any rectangular shape for your tile we recommend that you use a square as this is the most regular shape to repeat.

STEP 1 - USE NATURE AS YOUR INSPIRATION


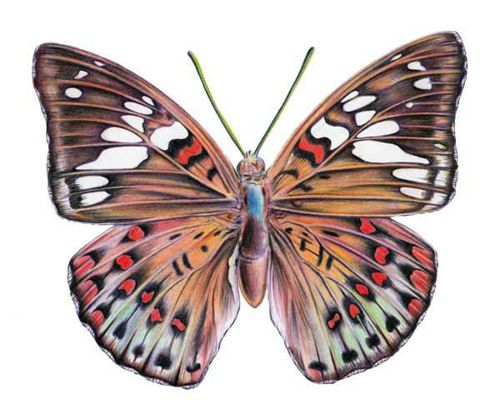
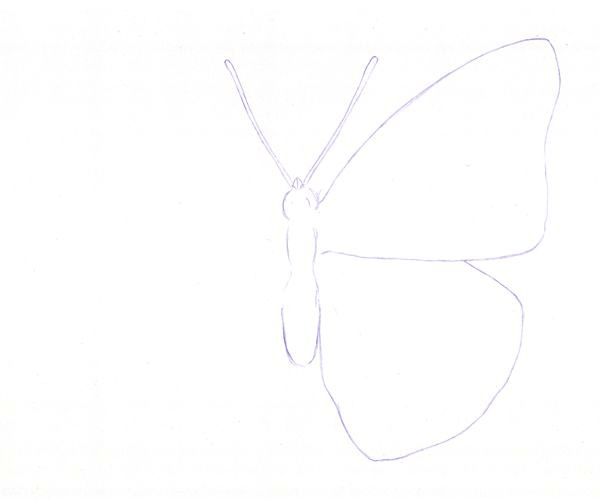
Images drawn from nature often provide the best inspiration.
Although it is possible to use any image, many artists and designers look to the patterns and forms that already exist in nature for their inspiration. Objects such as leaves, flowers, shells and insects are excellent for this practice as they already have an abundant variety of natural patterns and forms.
NOTE: Drawing from nature is a good way to create your source image because you discover natural patterns that you would never have invented for yourself.
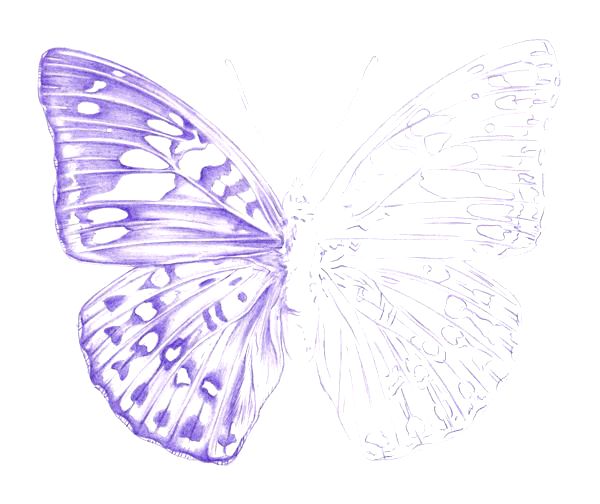
For our source image we have used the color pencil study from our Butterfly Drawing Lessonwhich is the ideal preparation for this project.

STEP 2 - SELECT A SQUARE SECTION OF YOUR DRAWING


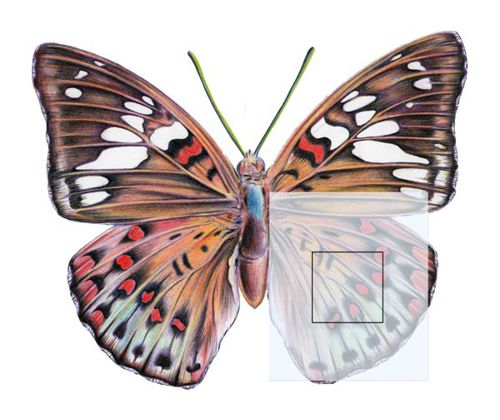
Select a section from your drawing that you find visually interesting.
Once you have prepared your source image you should select a square section of it to become the inspiration for your tile unit. We chose a square section as this is the simplest shape to repeat.
TECHNIQUE: Draw a square on a sheet of tracing paper. You can use this as a frame to select an interesting area from your source image. This is done by moving the square over the image until you find a section that is visually appealing.
NOTE: The size that you draw the square will become the size of your tile unit. Around 6cm. to 8cm. is a useful size to use.
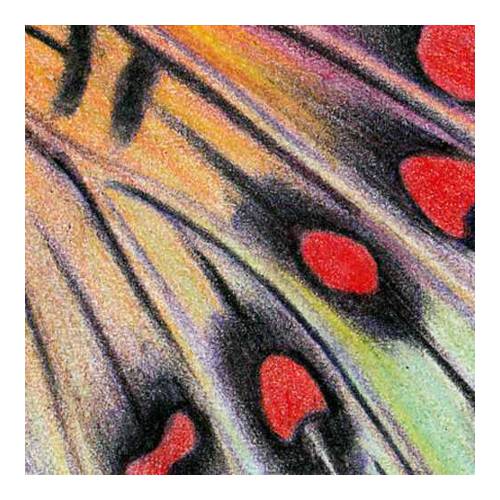
A close-up of the section from our drawing that was selected as the inspiration for our tile unit.
As the inspiration for our tile unit, we chose an area of the butterfly's wing that creates a diagonal movement of lines and shapes across the image. Diagonal arrangements on square tiles seem to form the most dynamic designs. They work better than horizontal or vertical arrangements as the tile already contains these elements in its horizontal and vertical edges.

STEP 3 - SIMPLIFY YOUR DESIGN INTO LINES AND SHAPES


A simplified tracing of the tile unit.
After choosing a section for your tile, take the sheet of tracing paper and using a soft grade pencil (grade B or 2B) trace a simplified outline of its main shapes inside the square. This will become the basic design for your tile unit which you may then develop by applying tone and color.

STEP 4 - DEVELOP YOUR DESIGN WITH TONE AND COLOR


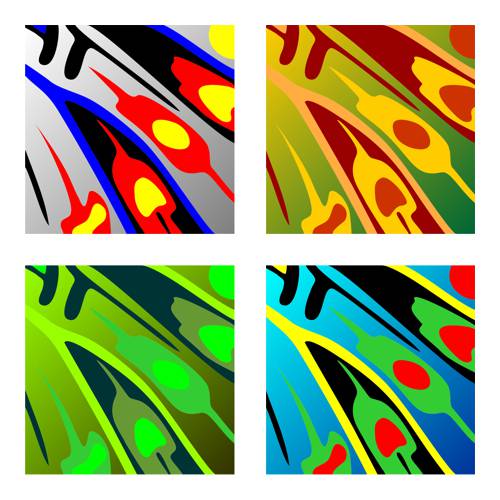
Explore the effects of tone and color on a development sheet
To develop your tile design, 'trace and transfer' the image several times onto an A4 sheet of paper using a layout like our illustration above. You can then explore the different effects of tone and color upon your design until you begin to discover certain combinations that appeal to you more than others.
NOTE: You can click here for a blank A4 template of our development sheet that you may print and use.
TRACE AND TRANSFER TECHNIQUE:  Take the traced outline of your tile and draw carefully over the image on the back of your tracing paper so that you have the same image pencilled on both sides. Now place your tracing onto a sheet of paper and draw over the lines of your design to transfer the image. Use a soft grade pencil (grade B or 2B) as this will transfer more easily.
MEDIA: The best media to choose for this project if you are creating your image by hand are color pencils, paint or even collage. You could also complete the project digitally using imaging software such as Photoshop, Illustrator or CorelDraw.

STEP 5 - SELECT YOUR BEST DESIGN


The final tile unit for our repeat pattern
Finally, from your development sheet select one design that appeals to you more than the others. This is your chosen 'tile unit' that you can now repeat to construct your pattern as illustrated in our next lesson: Designing the Repeat Pattern.

HOW TO DRAW A BUTTERFLY WITH COLOR PENCILS

HOW TO DRAW A BUTTERFLY WITH COLOR PENCILS

Butterflies use the patterns and colors on their wings to communicate with one another, to camouflage themselves and to ward off predators. Artists, designers and scientists have long been fascinated by their rich language of color which ranges from the most delicate harmonies to the dazzling contrasts of iridescent hues.

THE WING STRUCTURE OF A BUTTERFLY


All butterflies have a similar a skeletal structure on their wings.
It is very helpful when drawing a butterfly if you have some understanding of its wing structure before you start. This will help you to organize the complex arrangement of colours and patterns that make these creatures so beautiful.
  • Each butterfly has four wings: two forewings and two hindwings.
  • The shape of each wing is formed by a 'skeleton' of veins over which a membrane of 'skin' is stretched.
  • The structure of this skeleton is similar, but varies in proportion in different butterflies.
  • The variations that you see in the shape of butterflies correspond to variations in its skeletal proportions.
  • The arrangement of colors and patterns on butterfly wings also corresponds to its skeletal structure.

DRAWING A BUTTERFLY: STEP 1


Drawing a Butterfly - Step 1
Start the drawing with the body and two wings on one side.
Our butterfly drawing begins with a simple line sketch of the insect's body. This has three main sections: the head and antennae; the thorax (middle section) and the abdomen (lower section).
Next draw a forewing (top) and a hindwing (bottom) paying particular attention to:
  • the difference in shape between the forewing and hindwing.
  • their proportion in relation to the size of the body.
  • the points where they attach to the side of the body.
TECHNIQUE: Color pencil pigment is transparent and our butterfly drawing technique takes advantage of this quality by gradually building up the image with layers of color. Consequently the underlying sketch was begun using a purple pencil as other colours can be shaded over this without losing their vitality.
Note: If you start your underlying sketch with a graphite pencil, your colors will become soiled as you blend them.

DRAWING A BUTTERFLY: STEP 2


Drawing a Butterfly - Step 2
Establish the skeletal structure of the wings.
Now you should try to establish any details of the skeletal structure in the wings. Although these lines are often difficult to see, any information of this type will help you to arrange the colours and patterns of the wing markings.
Note: At this early stage of the drawing keep your lines as light as possible so that you can rub out any mistakes. You can erase color pencil if it is drawn lightly but it becomes more of a problem if your line is too heavy.

DRAWING A BUTTERFLY: STEP 3


Drawing a Butterfly - Step 3
Outline the shapes of colors and patterns on the wings.
Next you can outline the colors and patterns on the wings. If you have managed to plot some of the skeletal structure in Step 2, you will notice how the arrangement of the shapes and colors of the wing markings correspond to its sections.

DRAWING A BUTTERFLY: STEP 4


Drawing a Butterfly - Step 4
You have a choice of techniques when balancing the wings.
Once you have completed the markings on the first two wings you are faced with a choice: to take a shortcut or to follow the same path.
A SHORTCUT: As butterfly wings appear symmetrical, you can trace and transfer the wings across to the other side of the body in order to form the second set of wings. The advantage of this technique lies not only in its speed, but also in its capacity to create a well balanced drawing, particularly if you have made the odd mistake in the first set of wings. When you trace and transfer your drawing, your so-called 'mistakes' are also duplicated. However, they are symmetrically balanced by this technique, making them look deliberate. Consequently they are less likely to be read as errors.
THE SAME PATH: By following the same path you simply continue with your observational drawing for the second set of wings. As the wings are not exactly symmetrical this is the more difficult choice because it demands greater concentration to capture the slight variations of shape and color between each side. It is this path that we followed in this drawing as you can see by comparing the wing markings in the drawing above.

DRAWING A BUTTERFLY: STEP 5


Drawing a Butterfly - Step 5
We begin to establish the tonal structure of the drawing
Before you apply any color you need to establish the tonal structure of the drawing. At this stage you should continue to use the purple pencil as other colors will comfortably blend over it.
Note: Avoid shading any areas of pure color such as the red markings on the wings. You should also be careful when shading lighter areas such as the blue tints on the hindwings as you do not wish your undertones to subdue the intensity or brightness of color in these areas.
You will notice that our artist started the shading on the left hand side of the image. This is because he is right handed and wants to work away from what he has already drawn to avoid smudging it. If you were left handed you would obviously start on the right hand side.
TECHNIQUE: There is a lot of graduated shading in this drawing and you can use our Pencil Shading Exercise Sheet to help you practice your skills.

DRAWING A BUTTERFLY: STEP 6


Drawing a Butterfly - Step 6
Finish the tonal study of the image before applying any color.
Before you apply any color you should finish the tonal study of the butterfly. It is so tempting to apply small sections of color to see what it looks like, but you should avoid doing this because you need to carefully build up your colors in more expansive layers to achieve an overall balance.

DRAWING A BUTTERFLY: STEP 7


Drawing a Butterfly - Step 7
Start to build up your colors in layers - yellow.
Analyze the colors you wish to create by breaking them down into their basic hues i.e. the colors you would use to mix them. Then apply these in layers of pure color starting with the lightest color of the mixture. For example, on this butterfly we wish to create a yellowish-orange that graduates to a dark brown on the forewings and pink and turquoise-blue on the hindwings. Therefore we start with a foundation of yellow that gradually fades as it changes color.

DRAWING A BUTTERFLY: STEP 8


Drawing a Butterfly - Step 8
Developing the layers of color - orange changing to red.
To build up the necessary depth of color we applied a layer of orange which gently changes to red on the hindwings. Note how the transparent layers of yellow and orange blend with the purple and begin to form a brown. We also used flat areas of pure red to create the spots and stripes on the wings.

DRAWING A BUTTERFLY: STEP 9


Drawing a Butterfly - Step 9
Adding another layer of color - turquoise blue and green.
While adding another layer of orange and red to further intensify our color, we applied some light tints of turquoise blue and green for the lower sections of the hindwings.
Note: You do not add white to create tints in color pencil drawing. You create tints by shading lightly and letting the white of the paper shine through the transparent pigment.

DRAWING A BUTTERFLY: STEP 10


Drawing a Butterfly - Step 10
Applying the final layer of colors - brown changing to a dense black.
Finally, the drawing is completed by adding the darkest colors. Brown is applied to transform the darker areas of tone which concentrate in a dense black around the skeletal form and patterns on the wings.
Note: The darkest colors should always be applied last as it is easier to control their tonal impact by slowly building them up at the end of a drawing.

LESSON 1: REPEAT PATTERNS INSPIRED BY NATURE

LESSON 1: REPEAT PATTERNS INSPIRED BY NATURE

This lesson teaches you how to design a repeat pattern using any drawing from nature to create a 'tile' unit. This unit is then 'mirrored' like a kaleidoscope to produce a repeat pattern. The inspiration for this design is based on our Drawing of a Butterfly.

Sunday 27 July 2014

ANCIENT EGYPTIAN HIEROGLYPHICS - THE ROSETTA STONE

THE ROSETTA STONE


THE ROSETTA STONE
THE ROSETTA STONE
The Rosetta Stone is our key to understanding the meaning of hieroglyphs.
The Rosetta Stone was a black basalt slab with the same piece of writing carved in three different languages: Hieroglyphics (top), Demotic (middle) and Greek (bottom).
Scholars were able to make sense of the hieroglyphic version by comparing it with the Greek which they already understood.
The Rosetta Stone was discovered in 1799, during the French Revolutionary Wars, by one of Napoleon's officers near the town of Rosetta (now called Rashid) . In 1801, it was captured by the British and, since 1802, has been on show in the British Museum.
In 1822, a French Egyptologist called Jean Francois Champollion (1790-1832) was the first person to translate all the hieroglyphs on the stone. He discovered that it was a piece of writing in praise of the good works of the pharaoh Ptolemy V and that it was carved in 196 BC.
Thanks to his work, we now have a knowledge of the language of the Ancient Egyptians and an appreciation of this great civilisation through the many hieroglyphic writings that have survived.

ANCIENT EGYPTIAN HIEROGLYPHICS - PECTORALS AND CARTOUCHES

PECTORAL DECORATIONS


TUTANKHAMUN'S PECTORAL DECORATION
TUTANKHAMUN'S PECTORAL CARTOUCHE
Pectoral decorations are large ornamental necklaces which are worn over the chest. These necklaces often supported a large piece of jewellery like the one in the drawing above. This image is copied from a pectoral jewel discovered in the tomb of Tutankhamun. Its design is based on the hieroglyphs from his cartouche.

CARTOUCHES


TUTANKHAMUN'S CARTOUCHE
cartouche is an oval form which frames the hieroglyphs that make up the name of a God or Royal person.
It represents a looped rope which has the magical power to protect the name that is written inside it.
Cartouches were first used about 2500 BC. They were originally circular in shape, but gradually changed to an oval form with flat sides. This shape allowed a better arrangement of the hieroglyphs inside it.
On becoming king, the Pharaoh would adopt a royal name. This was called the 'prenomen'. It was often displayed along with the 'nomen' (the Pharaoh's birth name) in the form of a double cartouche.
Our example of the cartouche above is based on Tutankhamun’s 'nomen'. The three hieroglyphs at the top make up the name 'AMUN' and are placed in the most important position. The bird with two bread loaves reads 'TUT' and to its left is the symbol 'ANKH' which represents life. On the bottom row the crook which means 'ruler' is accompanied by two signs representing the city of Thebes.
Tutankhamun (c. 1352 - 1325 BC) became Pharaoh about the age of 9 and ruled until his death at 18. Little is known about him and he does not seem to have any major achievements.
However, he is one of the most famous pharaohs due to the discovery of his incredible tomb. It was found in 1922, in the Valley of the Kings at Luxor, by the British archaeologist, Howard Carter and his patron, Lord Carnarvon. In 1923, a few months after entering the tomb, Lord Carnarvon died. At the same time there was a power failure in Cairo and his dog in England also died. As a result, this gave rise to the myth of Tutankhamun's curse.
Tutankhamun's tomb was the most complete burial chamber ever found. While many other tombs had been plundered by thieves, Tutankhamun's was virtually untouched and filled with priceless treasures.

ankh-scarab-wedjat

ANKH


ANKH
ANKH
The Egyptian hieroglyph of the ankh is one of the best known good luck charms.
In Ancient Egypt the hieroglyph 'ankh' meant ‘to live’.
It is often seen on wall paintings and as a charm in the form of jewellery. Many hieroglyphic symbols are still used today in the design of modern jewellery.
As a symbol of life, it was adopted as a cross design ( the Coptic cross ) by the early Christians in Egypt.

SCARAB


SCARAB
SCARAB
The scarab beetle was a symbol of great power in Egyptian mythology.
It was said that it pushed the sun into the sky at the dawn of each day.
Scarabs are common dung beetles and are often seen pushing around a huge ball of dung, many times their own size and weight.
The myth probably grew from the great strength and determination that they display in this practice.

WEDJAT EYE


WEDJAT EYE - EYE OF HORUS
The Wedjat Eye, also known as the 'Eye of Horus', was thought to have magical powers. It was believed to have the ability to protect and heal.
Pairs of wedjat eyes were painted on coffins or tombs to protect against 'the evil eye'.
The lines drawn beneath the ‘wedjat’ eye represent the markings on a falcon’s face.
The Ancient Egyptians admired the physical qualities and instincts found in animals.
Various creatures were used as symbols of their gods, who were usually represented as figures with the head of an animal on the body of a human.
Horus was an Egyptian god who was usually shown with the body of a man and the head of a falcon.
His name means 'Far-Above-One' and he was the god of the sky who posessed the qualities of light and goodness.
Osiris ( the god of the underworld ) was his father and Isis ( the goddess of nature ) was his mother.
In Ancient Egyptian mythology, Seth ( the god of darkness and evil ) attacked and killed his brother Osiris as he was jealous of his power and wanted his throne.
Horus, who was the true heir to Osiris' throne, avenged his father's death by defeating and finally destroying Seth after a series of contests.

ANCIENT EGYPTIAN HIEROGLYPHICS PH, SH, TH

ANCIENT EGYPTIAN HIEROGLYPHICS PH, SH, TH


HIEROGLYPH PH
HIEROGLYPH PH
The horned viper is used for the "PH" sound in words like Pharaoh and names like Philip and Stephanie.

HIEROGLYPH SH
HIEROGLYPH SH
The lake is used for the "SH" sound in words like ship and shape and names like Shirley and Sharon.

HIEROGLYPH TH
HIEROGLYPH TH
The round basket is used for the "TH" sound in words like throne and thunder, and names like Thelma.